🚙 Driving Exam Masterclass
New Additions to the Gaimen Kirikae Driving Test
(From October 2025)
As of October 2025, the Gaimen Kirikae driving test has become stricter.
New elements such as hill starts, railroad crossings, and the Designated Speed Zone are now included — tasks that were not part of the exam in many prefectures before.
👉 You can find these new sections at the bottom of this page.
General Tips ✅
1. Know the Specific Rules and Marking Criteria for the Gaimen Kirikae Driving Test
-
As you may already know, the Gaimen Kirikae driving test uses a deduction system.
-
You start with 100 points, and to pass, you must finish with 70 points or more.
-
To succeed, it’s essential to understand how you should drive — and, more importantly, what you should avoid doing — so that you don’t lose marks unnecessarily.
-
On this page, you’ll learn about all the marking criteria and how they apply in various driving situations.
2. Be prepared (Know the course beforehand!)
-
Your examiner will tell you which route to take during the test, but we strongly recommend getting a course map in advance so you can familiarize yourself with the entire route.
(You can easily get a course map at the driving center.) -
Knowing the course beforehand helps reduce unnecessary stress and lets you focus more on your driving.
3. Be extra careful
-
During the exam, there will usually be only one or a few cars on the course.
-
Even so, you must prove to the examiner that you are a safe and cautious driver.
-
Make your safety checks clear and visible — for example, by leaning forward or looking over your shoulder when checking blind spots.
(We’ll discuss detailed safety check procedures later in this guide.)
How to take our lessons 👨🏫🧑🏫
〜 Our recommendation 🙋♂️〜
1. Read the contents
2. Watch the video
Of course, you can take our lessons in any way you prefer.
However, we have structured the lessons so that by following the order above — Read → Watch — you can maximize your understanding.
We’ve included everything we want you to know in the written materials, and the supplementary videos will help reinforce your knowledge, showing the real speed and timing of driving techniques that are difficult to grasp through text alone.
So, especially for those who have just started the course, please read the written content first.
Lesson 0: Fundamental Principles 1👨💼
〜 Safety Check👀 〜
Safety checks are by far the most important aspect of the driving exam.
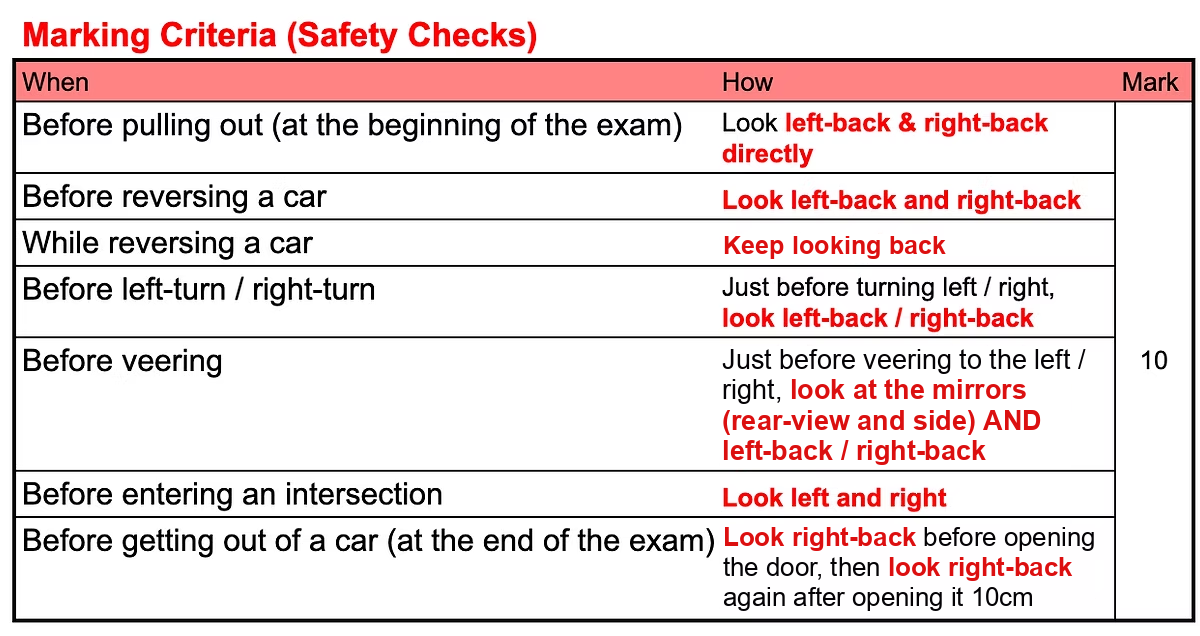
During the exam, you will conduct safety checks in most situations, and missing even a few required safety checks will surely lead to failing the exam (each missed safety check costs 10 marks).
Thus, make sure you read this section carefully and understand this concept properly.
"Proper" safety check
There are two ways to conduct a safety check visually (not through mirrors).
-
Look left / right means turn your head to look left / right
When you need to look either left or right, turn your head. Looking left or right with just your eyes is not considered a safety check because your examiner cannot tell if you actually performed a safety check. Try to exaggerate this action (but not for too long).
-
Look left-back / right-back means look over your left / right shoulder
When you need to check the safety of the blind spot, look over your shoulder to check safety.


【Image 0-1: Look left】

【Image 0-3: Look left back】

【Image 0-2: Look right】

【Image 0-4: Look right back】
When to conduct safety checks
Look at the table below to see when and how you are required to perform safety checks as well as the marking criteria.
Lesson 0: Fundamental Principles 2 👨💼
〜 ⬅️💡➡️Indicator (Signal) ⬅️💡➡️ 〜
An indicator (blinker/signal) is also used quite frequently in the driving exam, so we wanted to explain this important principle early on.
When you need to turn on a signal
Look at the table below to see when you are required to turn on a signal.
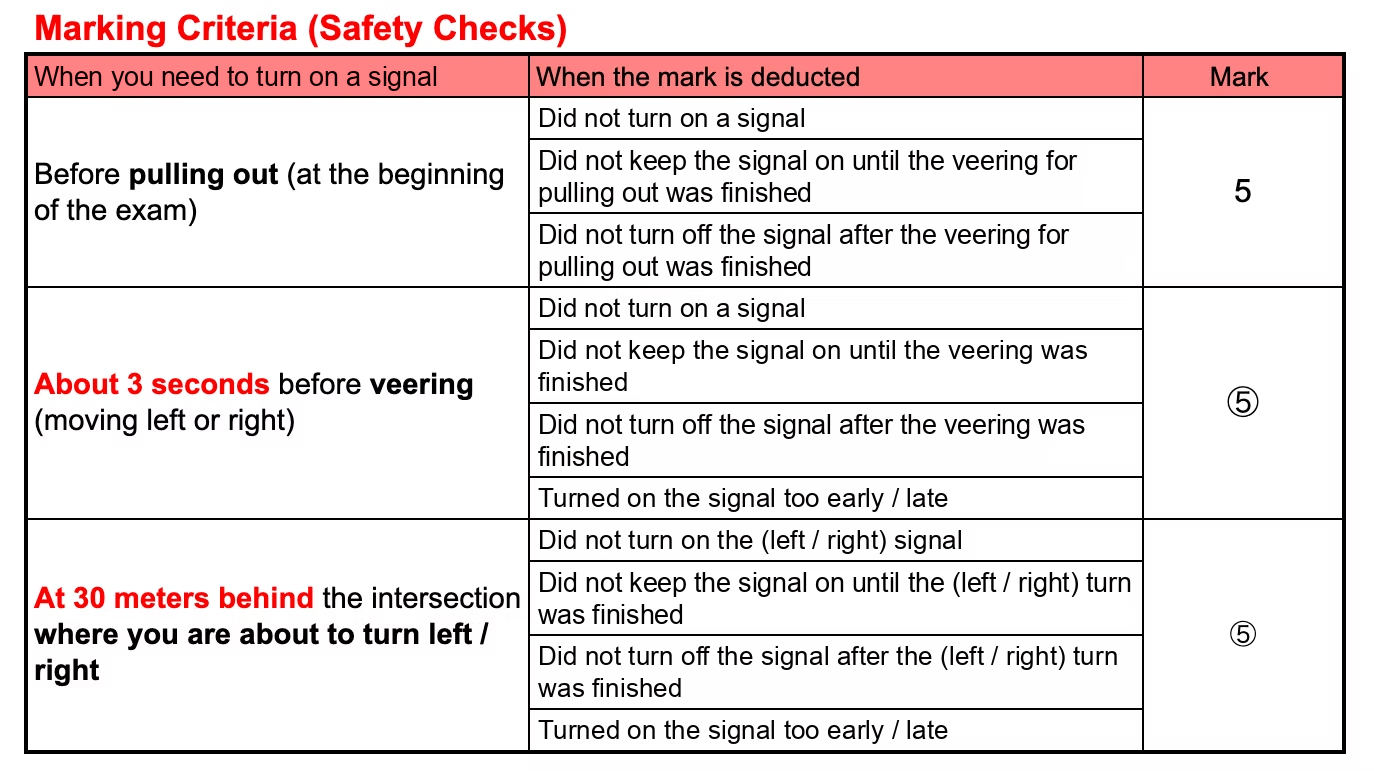
There are 3 situations where you need to turn on a signal.
-
Before pulling out
-
Before veering
-
Before turning left / right at the intersection
1. Before pulling out
At the beginning of the exam, the car is usually parked along the left edge of the road.
After you get in and prepare, you will start the car and pull out to the right — moving from the left edge into the center of your lane.
Therefore, you must turn on the right signal before moving.
As long as you activate the signal before the car starts moving, you will not lose any points.
See “Lesson 3: Starting a Car” for the complete procedure.

【Image 0-5: Pulling out】
2. Before Veering
(If you are not familiar with “veering,” please refer to Lesson 5.)
Imagine you are driving on a road, and the car in front of you — slightly to the left — suddenly moves to the right, cutting in front of you.
That would be quite frightening and dangerous 🥶.
To prevent such accidents and let others know your intentions in advance, you must turn on your signal before veering.
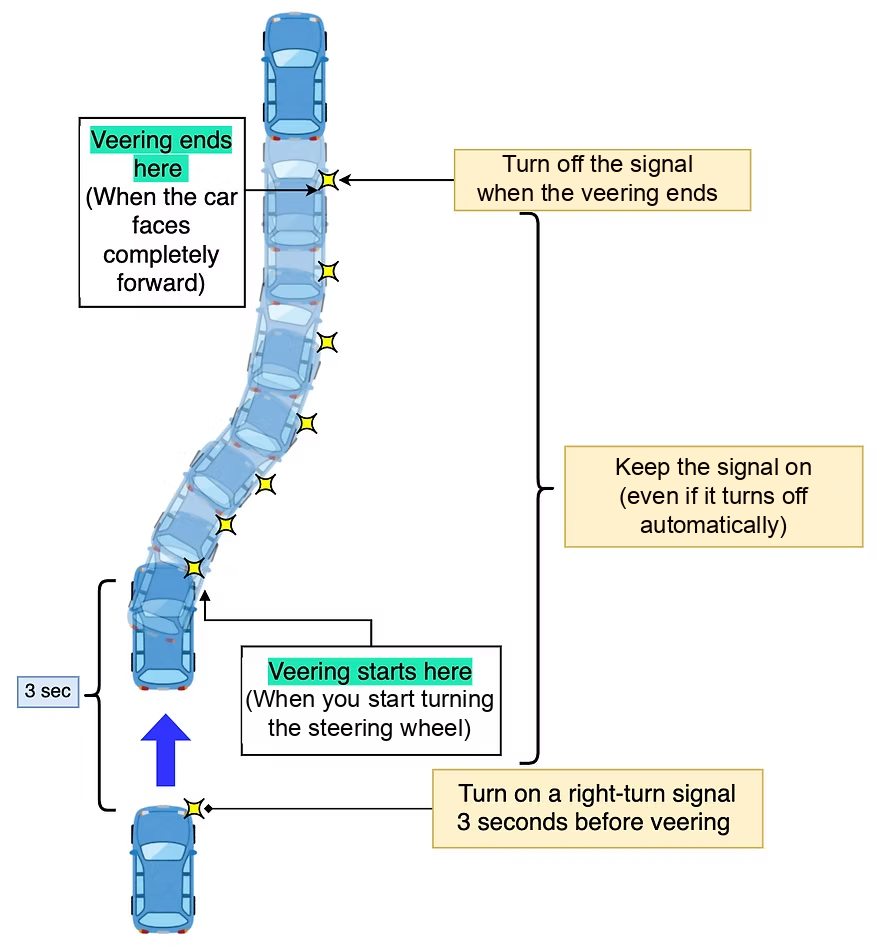
It generally takes about three seconds for other drivers to notice your signal.
For this reason, you should turn on the signal about three seconds before you veer — that is, before you start turning the steering wheel to the left or right.
In fact, as you will learn in Lessons 5, 7, and 8, you need to do a couple of safety checks before veering to the left or right.
These safety checks are:
-
When you veer to the left: check the rear-view mirror, the left side mirror, and the left back directly.
-
When you veer to the right: check the rear-view mirror, the right side mirror, and the right back directly.
To sum up, when you veer,
Turn on a signal (left / right) → Check the rear-view mirror → Check the (left / right) side mirror → Look (left / right) back directly → Turn the steering wheel (left / right)
See "Lessons 5, 6, 7 & 8" for the whole process.
3. Before turning left / right at the intersection
The third situation where you need a turn signal is before turning left or right at the intersection.
The rule is:
-
Turn on a left (/right) turn signal 30 meters behind the intersection when you are turning left (/right).
-
Turn off the signal when the turn is finished.
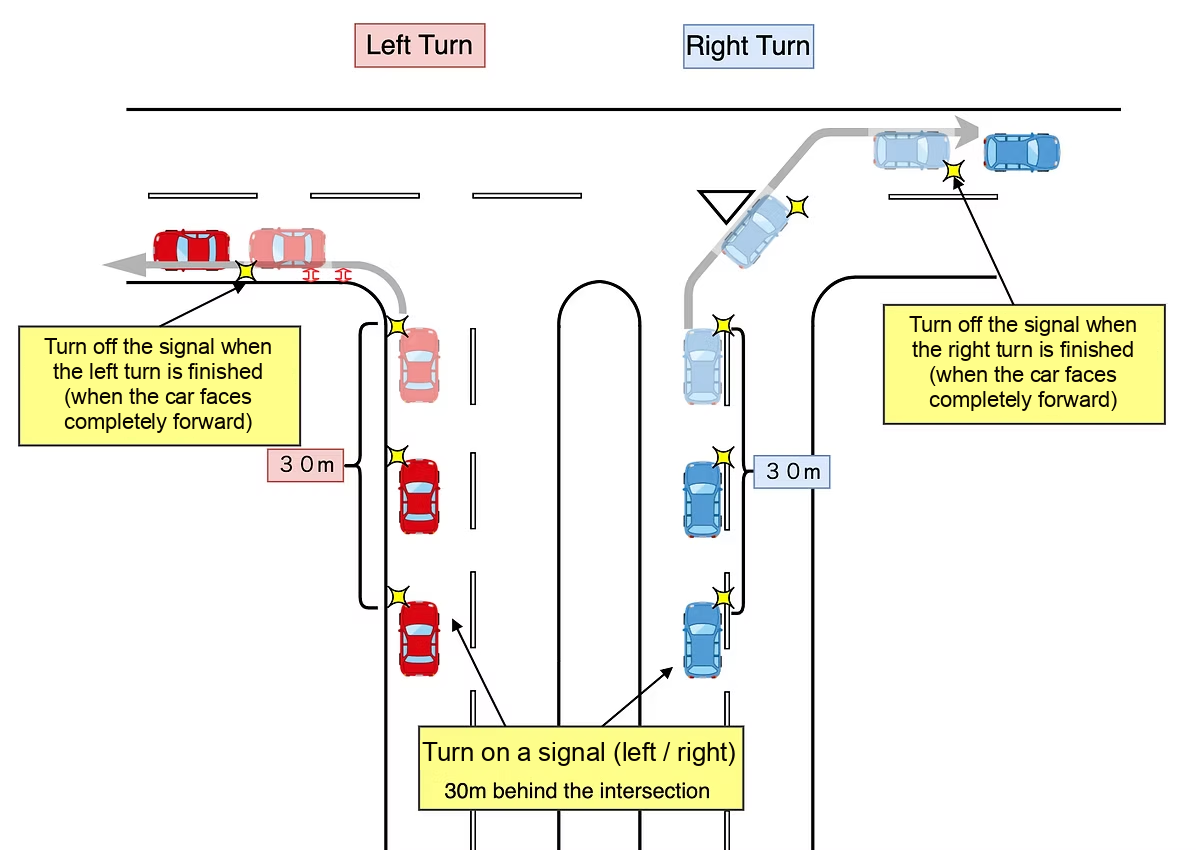
Actually, as you will learn in Lessons 7 and 8, you need to veer to either the left or right edge 30 meters behind the intersection. In order to veer, you need to turn on a signal 3 seconds before you actually steer to the left / right.
Technically, you can turn off the signal once you finish veering (this should be done 30 meters behind the intersection), and turn it on again for turning left / right.
However, it is totally fine to keep it on, and most drivers turn it on 3 seconds before veering and turn it off when the turn at the intersection is finished.
Isn't it getting complicated? Don't worry 😀. It is OK not to fully understand this at this stage.
You will fully understand this as you learn more.
If you want to clear your head first, see "Lessons 7 & 8" for the whole process of turning left and right at the intersection.
🚙 🚙 🚙 🚙 🚙 🚙 🚙 🚙 🚙 🚙 🚙 🚙 🚙
🏫 Lesson 1: Getting in a car 🏫
This is the first step of the driving exam. You are required to check the area around your car before you get in. This safety check should not take too long.
【Video 1: Getting in a car】
-
Bend down and look under the car from the back.
Make sure there is nothing under the car. From the back, walk counterclockwise. -
Check the left wheels
Quickly check the condition of the wheels. -
Bend down and look under the car from the front
Make sure there is nothing under the car. -
Look front and back just before opening the door.
Before opening the door, check if it is safe to open the door.
※ No need to lock the door. Leave it unlocked unless your examiner tells you to do so.
🚙 🚙 🚙 🚙 🚙 🚙 🚙 🚙 🚙 🚙 🚙 🚙 🚙
🏫 Lesson 2: Get ready before starting an engine 🏫
Once you get in the car, follow the 3 steps described below. Do not skip any of these steps before starting an engine.
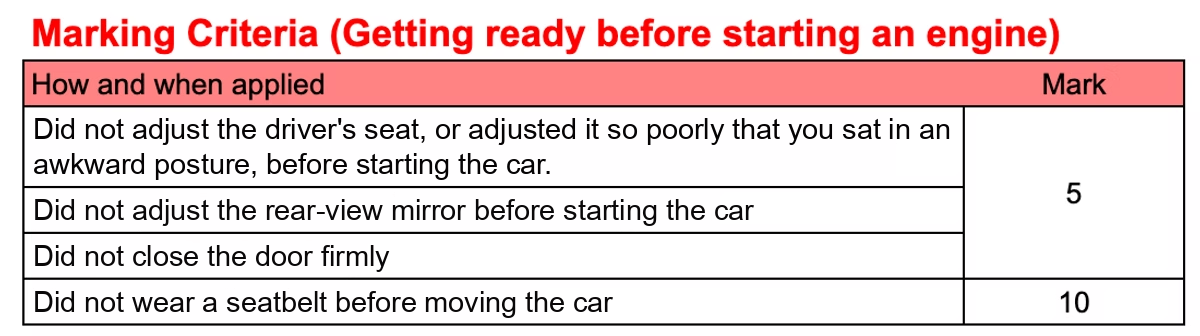
3 MUST-DO THINGS before starting an engine
-
Adjust the seat (5-mark)
Move your seat forward so that your left leg still bends slightly when you stretch it out. -
Adjust the rear-view mirror (5-mark)
Adjust it so that you can see the whole rear window through the rear-view mirror. Even if the mirror is already in the correct position for you, touch the frame of the mirror. -
Wear the seatbelt (10-mark)
Make sure it is not twisted
【Video 2: Get ready before starting an engine】
⚠️Adjust your rear-view mirror every time you adjust your seat.
What you can see in the rear-view mirror depends on your seat position.
Thus, if you adjust your seat (step 1) a second time after adjusting the rear-view mirror (step 2), make sure you adjust your rear-view mirror AGAIN.
🚙 🚙 🚙 🚙 🚙 🚙 🚙 🚙 🚙 🚙 🚙 🚙 🚙
🏫 Lesson 3: Starting a car 🏫
In this lesson, you will learn how to start a car.
This sounds simple, but you are required to perform proper safety checks before moving and then start moving your car smoothly. So practice (physically or mentally) until this process becomes automatic😃
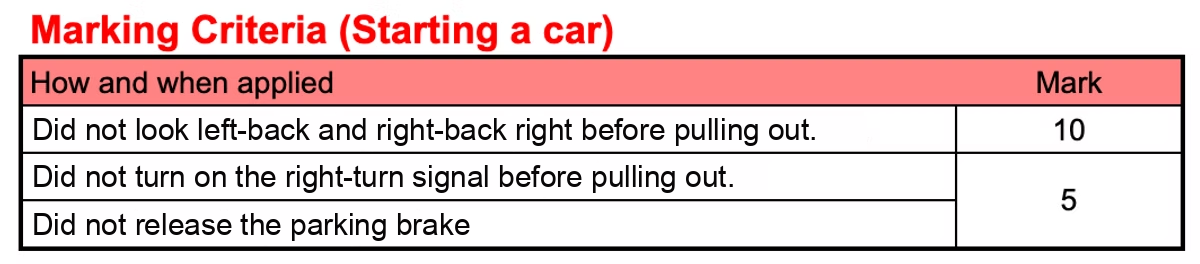
Steps to start a car
0. Adjust the side mirrors (0 marks)
-
Look left back and right back (10-mark)
-
Right turn signal (5-mark)
-
Gear to "D"
-
Release the parking brake (5-mark)
-
Look left back and right back AGAIN (10-mark)
【Video 3: Starting a car】
🚙 🚙 🚙 🚙 🚙 🚙 🚙 🚙 🚙 🚙 🚙 🚙 🚙
🏫 Lesson 4: Driving Position 🏫
Keeping a proper driving position is important at all times during the exam.
Let's learn which position to take on a straight road and on a curved road.
4-1. Drive on a straight road
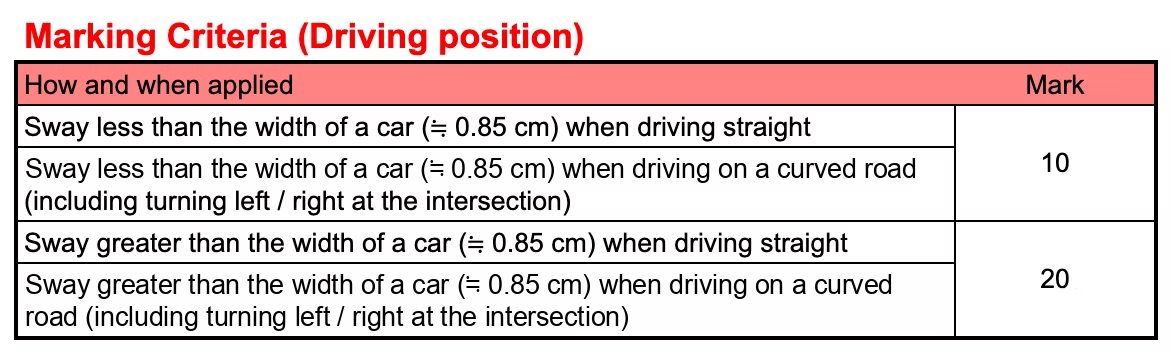
When driving on a straight road in Japan, make sure you are always in the middle of your lane
(or slightly to the left of the middle of your lane).

【Image 4-1-1: Driving position on a single lane】

【Image 4-1-2: Be always in the middle of your lane】
4-2. Drive on a curved road
Like driving on a straight road, make sure you are always in the middle of your lane while driving on a curved road (this is actually hard for beginner drivers).


【Image 4-2: Good & Bad driving position on a curved road】
The important thing to remember is that when you have just exited a curve and turned the wheel back to neutral, your car needs to face completely forward and be in the middle of your lane.
4-3. Drive on the left or right edge of your lane
In Japan, there are situations where you need to be on the edge of your lane.
These situations are:
-
Before turning at the intersection (both left and right)
-
Pulling over
-
Starting a car
This movement is called "Veering" and this is also quite an important skill to master.
We will discuss veering in detail later in Lesson 5.

【Image 4-3-1: Move to the edge before turning】

【Image 4-3-2: Move to the left edge to pull over】

【Image 4-3-3: Move to the right after starting a car】
🚙 🚙 🚙 🚙 🚙 🚙 🚙 🚙 🚙 🚙 🚙 🚙 🚙
🏫 Lesson 5: Veering (Moving left or right) 🏫
When you drive in Japan, there are some cases where you need to move to the left or right while driving.
This is called "Veering" (moving to the left or right while driving).
Basically, you need to veer in the 4 situations below (Image 5-1 ~ 5-4).

【Image 5-1: Veer to the right to start a car】

【Image 5-2: Veer to the left to pull over】

【Image 5-3: Veer to avoid an obstacle】

【Image 5-4: Veer to the left or right before turning at the intersection】
Veer to the left
You veer to the left in these situations.
-
Pulling over to park (Image 5-2)
-
Returning after avoiding an obstacle (Image 5-3)
-
Before turning left at the intersection (Image 5-4)
Steps to Veer to the left
(0. Check the rear-view mirror and left side mirror)
-
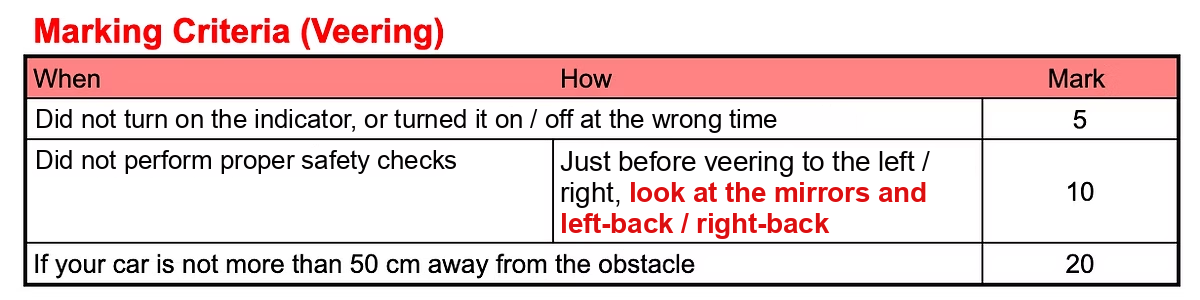
Activate a left-turn signal (5-mark)
-
Check the rear-view mirror, the left side mirror, and the left back directly (10-mark)
-
Veer to the left (turn the steering wheel to the left)
Step 0 is not mandatory, but it is better to do it for safety.
Veer to the right
You veer to the right in these situations.
-
Pulling out into a road (Image 5-1)
-
Avoiding an obstacle (Image 5-3)
-
Before turning right at the intersection (Image 5-4)
Steps to Veer to the right
(0. Check the rear-view mirror and right side mirror)
-
Activate a right-turn signal (5-mark)
-
Check the rear-view mirror, the right side mirror, and the right back directly (10-mark)
-
Veer to the right (turn the steering wheel to the right)
Step 0 is not mandatory, but it is better to do it for safety.
🚙 🚙 🚙 🚙 🚙 🚙 🚙 🚙 🚙 🚙 🚙 🚙 🚙
🏫 Lesson 6: Feel for your car 🏫
6-1. Avoiding obstacles
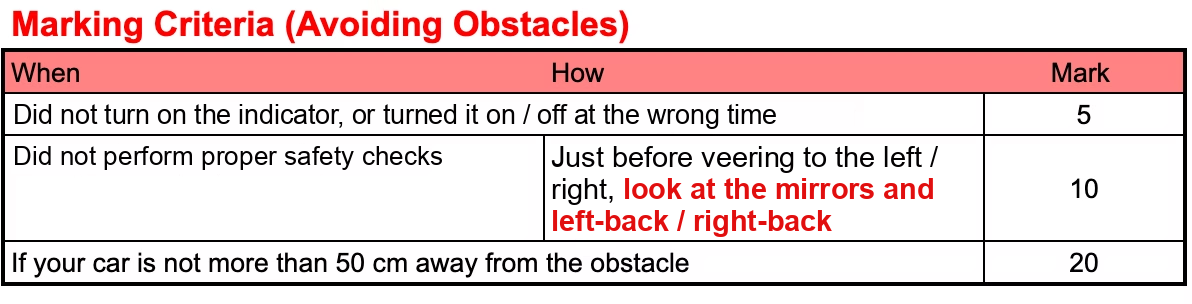
In the Gaimen Kirikae exam, there will be a parked car or an obstacle on the left edge of the road, and you will be required to avoid it correctly.

【Image 6-1: Avoiding an obstacle】
Steps to avoid an obstacle
-
Right turn signal on (5-mark)
-
Look "rear-view mirror", "right side mirror" & right back directly (10-mark)
Check that you can safely move to the right shortly. -
Veer to the right to avoid an obstacle
You are required to be at least 1.0 meter away from an obstacle (20-mark).
(This is because even if a person inside the parked car opened the door fully, you will not hit the door if you are more than 1.0 meter away from the car.) -
Once your car completely faces forward, switch the signal to the left (5-mark)
-
Look "rear-view mirror", "left side mirror" & left back directly (10-mark)
-
Veer to the left to return to your original position.
-
Once the car faces forward, turn off the signal (5-mark)
6-2. Feel the front and side.
There are some points where you need to stop during the exam (and, of course, when you drive on a road).
These points are:
-
behind the stop line
-
at the stop pole

【Image 6-2: Feel the front】
1. Behind the stop line
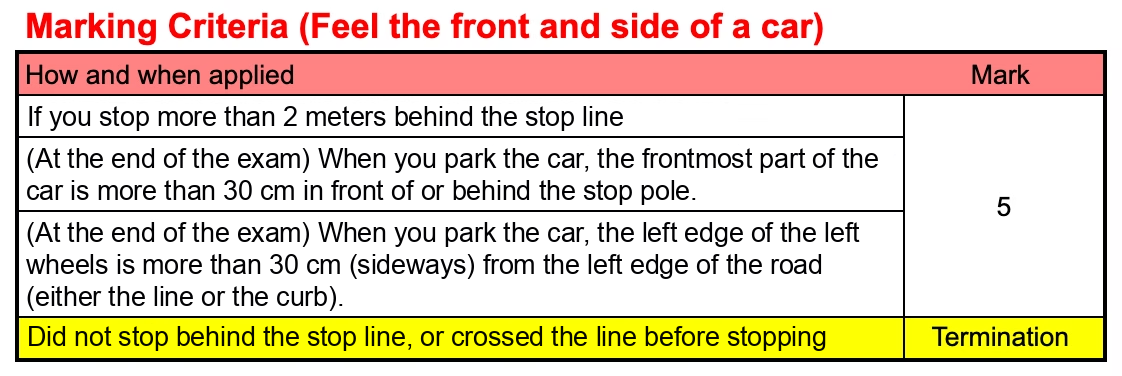
When the traffic light is red or yellow, and when there is a stop sign, you are required to stop the car behind the stop line.
The requirement is to stop where the front part of the car (the number plate) is within 2.0m behind the stop line.
DO NOT CROSS THE LINE (even 1 cm!!).
If you stop more than 2.0 m away from the stop line, your examiner will tell you to move forward a little bit. Move the car forward a little and try to stop within 2.0m behind the stop line.
When you stop behind the stop line where there is a stop sign, wait 3 seconds before moving the car again.
Stop, carefully look left and right, and then slowly accelerate.
Similarly, if you stop behind the stop line at a red light, after the light turns green, look left and right and start your car.
2. The stop pole
At the end of the exam, you will be told to pull over to the left and stop at the stop pole.
The requirements are:
-
Stop where the frontmost part of your car is in line with the stop pole.
Within 30 cm in front of or behind the stop pole is acceptable. -
Stop where the left wheels are within 30cm of the left edge (usually the white line).
6-3. Narrow roads (Crank & S-Curve).
Driving on narrow roads is the most difficult task for most people.
In order to successfully go through narrow roads, you need to be able to
-
get a feel for the car's body and wheels
-
adjust your speed
-
guide your car through
This will be extremely hard if you are a beginner driver. Indeed, these skills can only be gained through actual practice.
For this reason, our best advice for successful driving on narrow roads is to contact the driving school in your local area and take 1 ~ 2 hours of intensive lessons from a qualified instructor.
S-Curve

【Image 6-3-1: Left turn to enter an S-Curve】
Left Turn to enter an S-Curve
-
Be close to the left edge (from 30m behind the entrance of the S-curve).
Do not come too close to the left.
Do not forget to check the left-back before turning. -
Turn and try to bring your right-front wheel to ⭐️
-
Keep your right-front wheel to the right edge while driving on the left curve.
Be careful not to let your left-back wheel hit the edge⚠️. -
Once you come to ④, try to bring your left-front wheel to 🟢.
-
Once you come to ⑤, keep your left-front wheel to the left edge while driving on the right curve.
Be careful not to let your right-back wheel hit the edge⚠️.
Turn a (left / right) turn signal on. -
Stay close to the left while driving on the right curve.
-
Stop for at least 3 seconds if there is a stop sign.

【Image 6-3-2: Right turn to enter an S-Curve】
Right Turn to enter an S-Curve
-
Be close to the center line (from 30m behind the entrance of the S-curve).
-
Turn and try to bring your left-front wheel to ⭐️
-
Keep your left-front wheel to the left edge while driving on the right curve.
Be careful not to let your right-back wheel hit the edge⚠️. -
Once you come to ④, try to bring your right-front wheel to 🟢.
-
Once you come to ⑤, keep your right-front wheel to the right edge while driving on the left curve.
Be careful not to let your left-back wheel hit the edge⚠️.
Turn a (left / right) turn signal on. -
Stay close to the left while driving on the left curve.
-
Stop for at least 3 seconds if there is a stop sign.
Crank

【Image 6-3-3: Crank-1】
Crank -1
-
Be close to the left edge (from 30m behind the entrance of the crank).
Do not come too close to the left.
Do not forget to check the left-back before turning. -
Turn and try to bring your right-front wheel to ⭐️
Watch out for your left-back wheel⚠️ -
Come close to the left edge
-
Turn and try to bring your right-front wheel to 🟢. Watch out for your right-back wheel⚠️
-
Come close to the right edge
Turn a (left / right) turn signal on if you turn after exiting this crank. -
Turn and try to bring your right-front wheel to 🟦. Watch out for your left-back wheel⚠️
-
Stop for at least 3 seconds if there is a stop line.

【Image 6-3-4: Crank-2】
Crank -2
-
Be close to the left edge (from 30m behind the entrance of S-curve).
Do not come too close to the left.
Do not forget to check the left-back before turning. -
Turn and try to bring your right-front wheel to ⭐️
Watch out for your left-back wheel⚠️ -
Come close to the right edge
-
Turn and try to bring your right-front wheel to 🟢. Watch out for your left-back wheel⚠️
-
Come close to the left edge
Turn a (left / right) turn signal on if you turn after exiting this crank. -
Turn and try to bring your left-front wheel to 🟦. Watch out for your right-back wheel⚠️
-
Stop for at least 3 seconds if there is a stop line.
If you are not able to successfully go through Crank & S-curve roads in one go, don't worry.
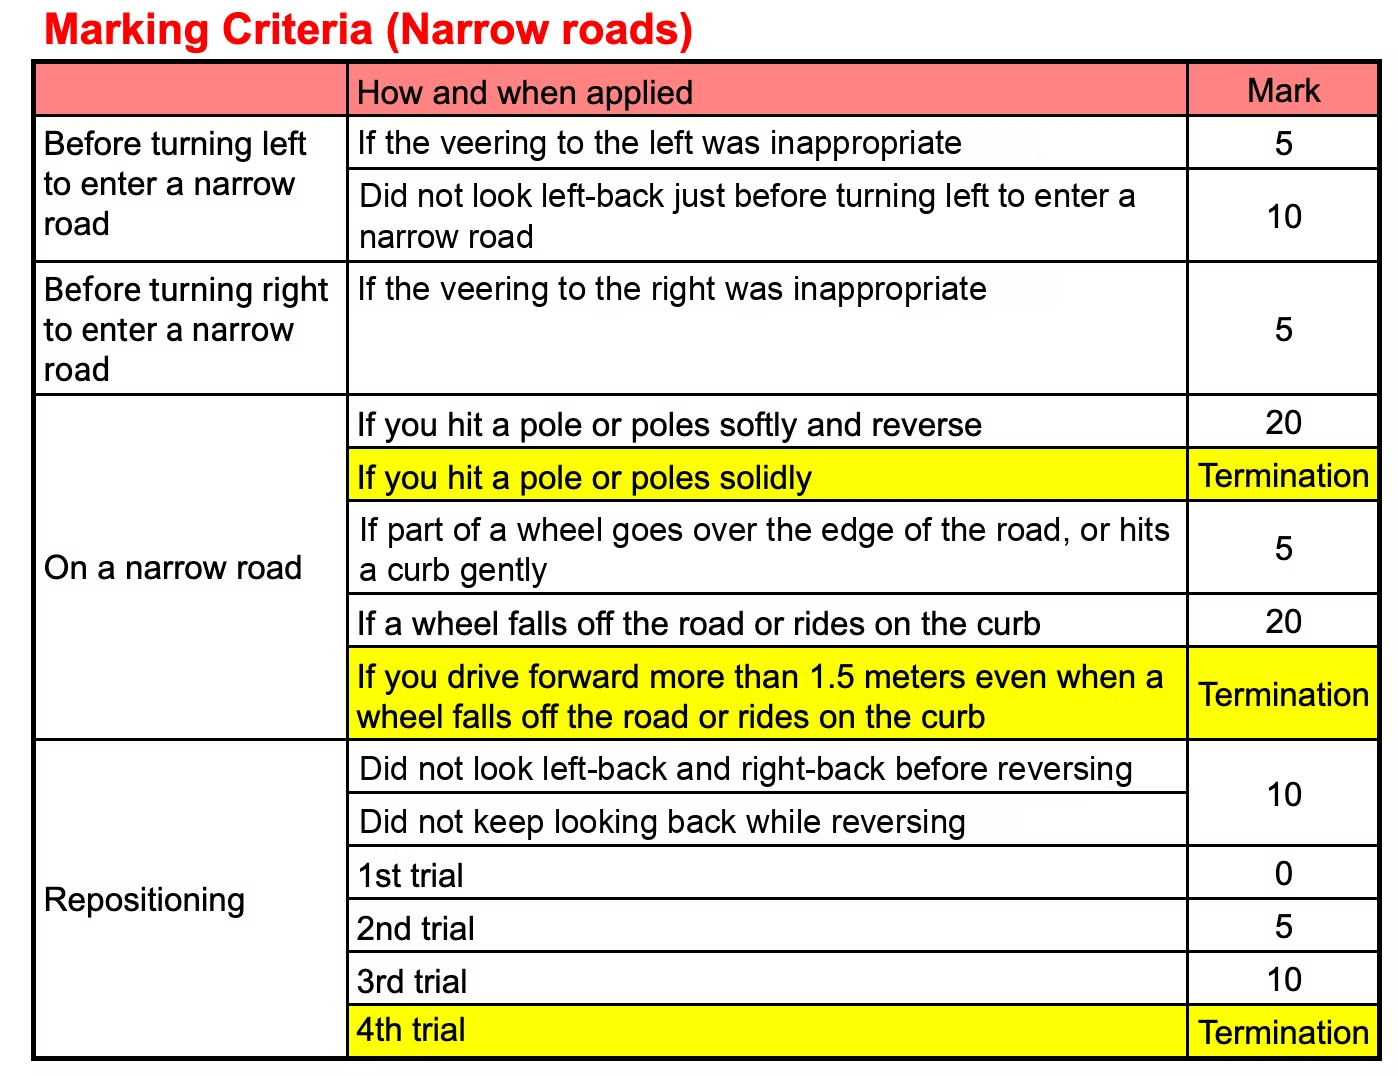
You can back up to reposition yourself and try again. This back-up technique is called "repositioning".
There are some important points when you do "repositioning".
-
Check the safety (this is always the most important thing)
-
Know which way to back up to reposition yourself.
For safety checks, always follow these steps:
1. Check the rear-view mirror, left-back and right-back (10-mark)
2. Put the gear to "R"
3. Keep looking back (left and/or right) while backing up (10-mark)
Repositioning (Backing up)


Which way to back up
Turned too quick when turning right
-
Check the rear-view mirror and behind you directly.
-
Gear to "R"
-
Keep the wheels as they are.
-
Back up to your original position. Keep looking back while backing up
-
Gear to "D", look left and right back again before you go.
Turned too late when turning left
-
Check the rear-view mirror and behind you directly.
-
Gear to "R"
-
Turn the steering wheel to the right "fully"
-
Back up a little bit. Keep looking back (especially right-back) while backing up
-
Gear to "D", look left and right back again before you go.
【Image 6-3-5: Repositioning-1】
【Image 6-3-6: Repositioning-2】
【Image 6-3-7 Repositioning-3】
Turned too late when turning right
-
Check the rear-view mirror and behind you directly.
-
Gear to "R"
-
Turn the steering wheel to the left "fully"
-
Back up a little bit. Keep looking back (especially left-back) while backing up.
-
Gear to "D", look left and right back again before you go.
Turned too late when turning right
-
Check the rear-view mirror and behind you directly.
-
Gear to "R"
-
Turn the steering wheel to the left "fully"
-
Back up a little bit. Keep looking back (especially left-back) while backing up.
-
Gear to "D", look left and right back again before you go.

Turned too quick when turning left
-
Check the rear-view mirror and behind you directly.
-
Gear to "R"
-
Keep the wheels as they are.
-
Back up to your original position. Keep looking back while backing up
-
Gear to "D", look left and right back again before you go.
【Image 6-3-8 Repositioning-4】
🚙 🚙 🚙 🚙 🚙 🚙 🚙 🚙 🚙 🚙 🚙 🚙 🚙
🏫 Lesson 7: Intersection 🏫
Driving through intersections (both going straight and turning left and right) is the most important part of the Gaimen-Kirikae exam. This is because the intersection has the most "lose-marks points", and thus, in order to pass the exam, you need to master proper safety checks and driving skills.
7-1. Going straight at the intersection
Going straight at the intersection is much simpler than turning left & right.
What you need to do is look left and right before entering the intersection.
(When it comes to an intersection with poor visibility, things are a bit different.
You can learn how to go through an intersection with poor visibility in Lesson 8).

7-2. Turn left at the intersection
Turning left at the intersection is made up of 2 phases.
1. Veering to the left edge (7-2-1)
2. Turn left at the intersection (7-2-2)
7-2-1. Veering to the left 30m behind the intersection
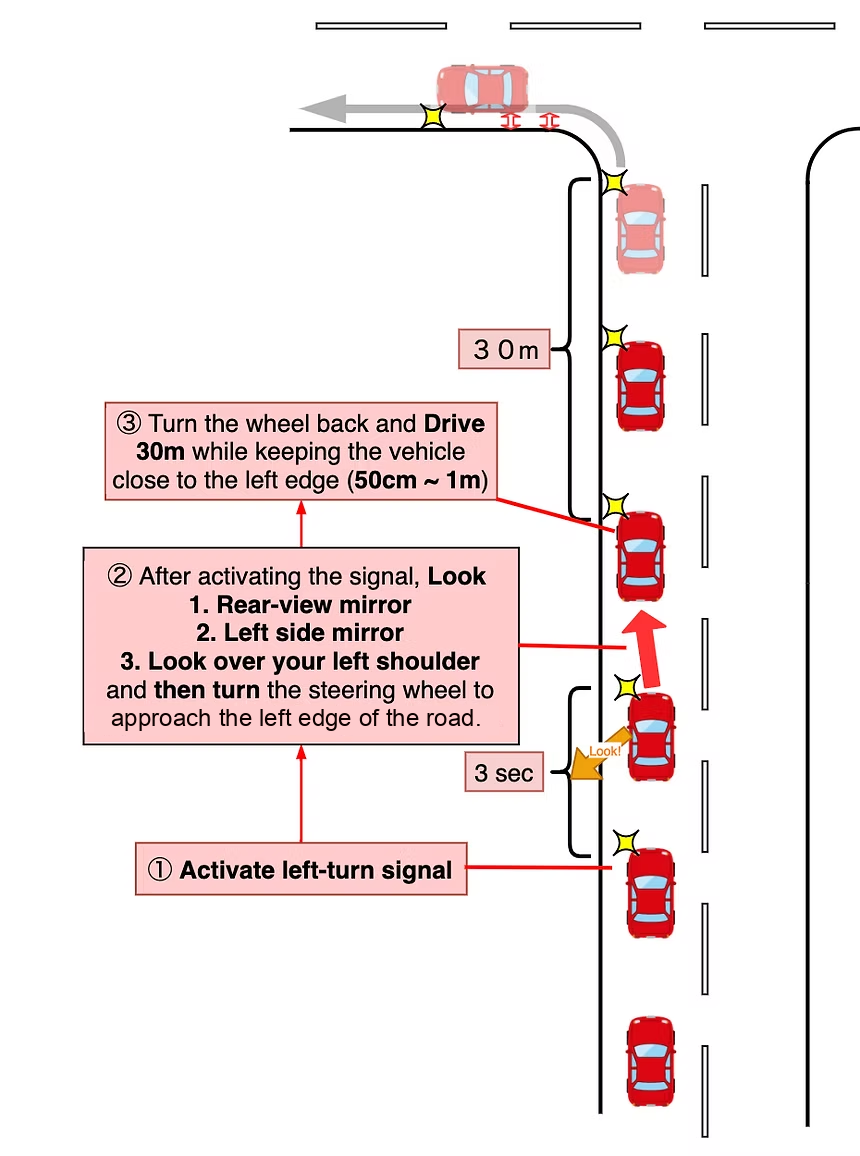
Before you turn left at the intersection, you need to be on the left edge of your lane.
(See the image on the left. You drive on the left edge for 30m behind the intersection).
The purpose of this move is to keep other vehicles (bicycles and motorbikes) from overtaking you on the left.
In order to be on the left edge from 30m behind the intersection, follow steps 1-3 below.
Steps to veer to the left
-
Turn on a left turn signal (5-mark)
(at roughly 50m behind the intersection, though this can vary depending on your speed) -
Look "Rear-view mirror", "left side mirror" and "Left-back" (10-mark) and then, turn the steering wheel to move to the left edge (5-mark)
-
Turn the steering wheel back to neutral and drive 30m while keeping on the left edge (5-mark)
【Image 7-2-1-1 Veering to the left before turning 】
Q. How close to the left edge do you need to be before turning left?

A. As close as 50cm from the left edge
Before you turn left at the intersection, you are required to move to the left edge so that others (motorcycles🏍 or bicycles🚴♂️) cannot pass on your left side.
Within 100cm of the left side is considered OK, but aiming to be 100cm away is not a good habit. Try to get as close as 50cm from the left edge.
In addition, try not to be too close (e.g. less than 50cm) to the left edge, because this will make your left turn extremely difficult despite the fact that you will not lose marks if you are too close (unless you step on the left edge).
【Image 7-2-1-2 How close you need to be before turning left】
7-2-2. Turning left
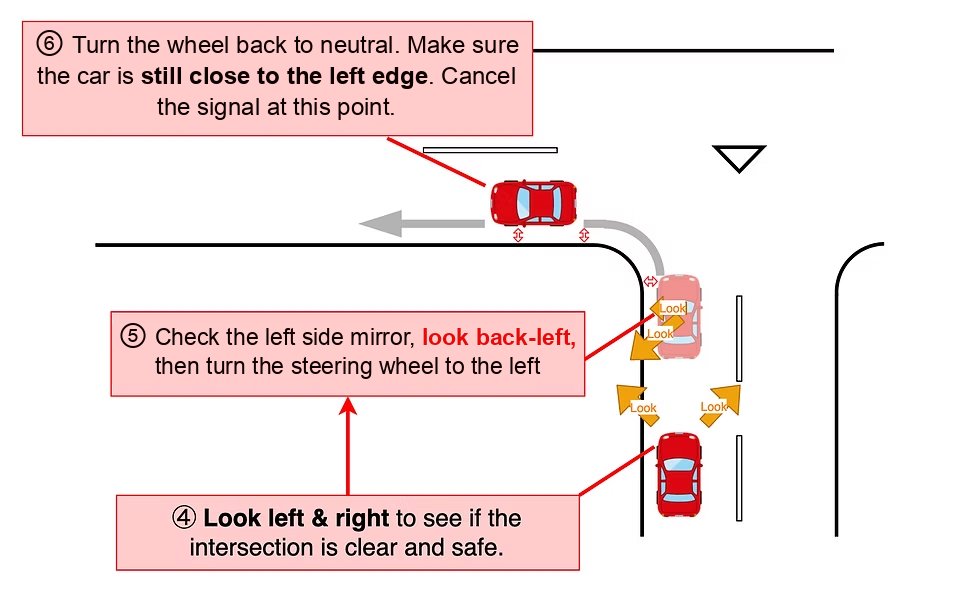
These are the steps to turn left:
4. Look left and right before entering the intersection (10-mark).
5. Look left side mirror & left-back and then turn the steering wheel to turn (10-mark).
6. Take the correct path of the left rear wheel (see below) (5-mark).
【Image 7-2-2 Turning left 】
【Video 7-2-2-1 Turning left 】
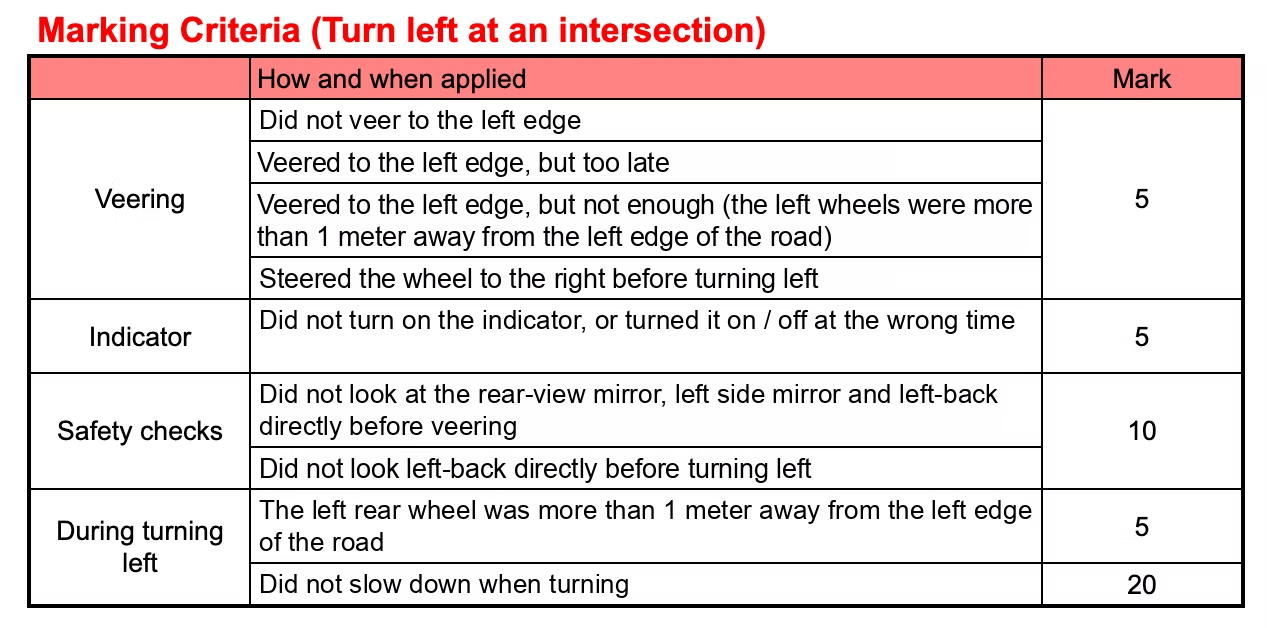
Indeed, the left turn is difficult to master.
Know the correct path of the left rear wheel during the left turn
Turning left beautifully is actually a hard task for most beginner drivers and this is probably because vehicles are right-hand drive in Japan. From the driver's seat, you cannot really see the left wheels and this makes the left turn difficult.
Here we would like you to know what good and bad left turns look like.
Here are the top 3 bad left turns (worst first).
-
Turn too soon and hit the curb with the left rear wheel
-
Turn too wide and quickly return to the proper position
-
Turn too wide and gradually return to the proper position (this is better than 2)
1. Turned too soon and hit the curb
If you turned too soon and hit the curb (20-mark), you will most likely not be able to pass the exam.
If you realize that you are about to hit the curb, back up and reposition your car and make a wider turn (see section 6-3 → repositioning).

2. Turned too wide and repositioned quickly
Turning too wide (5-mark) is better than turning too soon and hitting the curb (20-mark). However, this turning is also considered a bad turn.
A wide left turn is one where the left rear wheel is 1 meter or more away from the left edge of the corner.
If you turned too wide, try not to go back to reposition yourself too quickly (10-mark).
This is because repositioning too quickly skips the fundamentals of veering, namely the left turn signal and the subsequent safety checks of the left side mirror and the left back.
If you turned too wide, try to gradually go back to the proper position (see image below).


【Image 7-2-2-3 Turning too early】
【Image 7-2-2-4 Turning too wide and repositioning quickly】
【Image 7-2-2-5 Turning too wide and correct recovery】
【Video 7-2-2-2 Good & Bad Left Turn】
7-3. Turn right at the intersection
Like turning left, turning right at the intersection consists of two phases.
1. Veering to the right (until 30m behind the intersection)(7-3-1)
2. Turning right at the intersection (7-3-2)
7-3-1. Veering to the right 30m behind the intersection
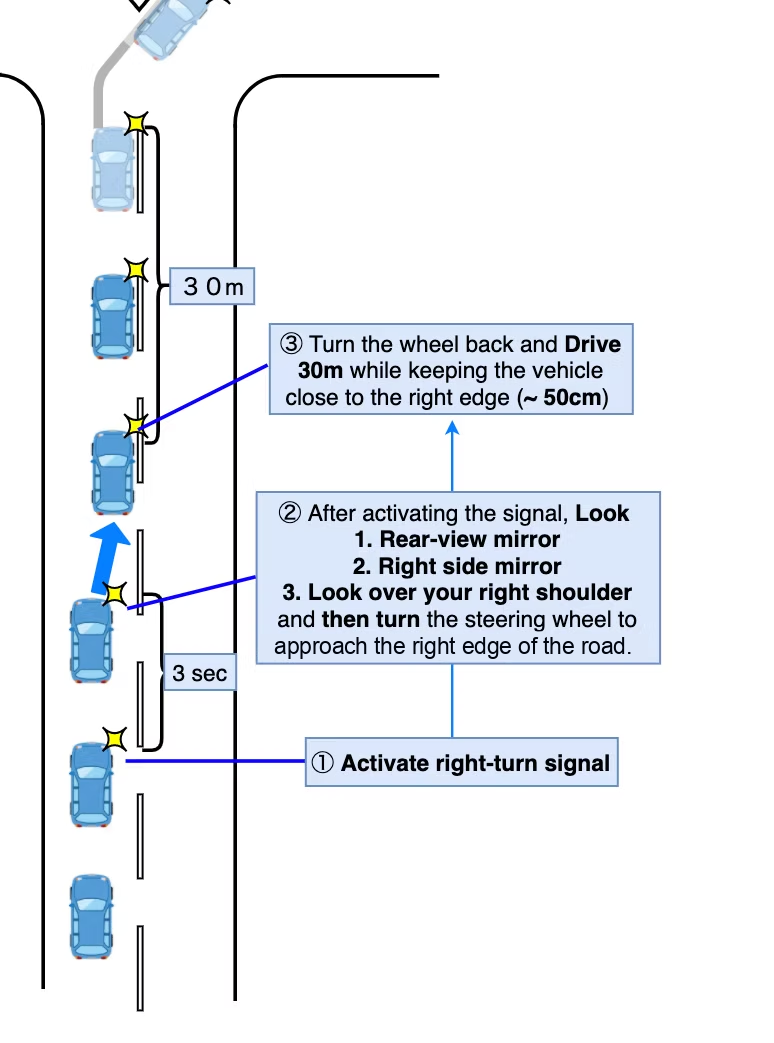
Before you turn right at the intersection, you need to be on the right edge of your lane.
(See the image on the left. You drive on the right edge for 30m behind the intersection.)
In order to be on the right edge from 30m behind the intersection, follow steps 1-3 below to veer.
Steps to veer to the right
-
Turn on a right turn signal (5-mark)
(at roughly 50m behind the intersection, though this can vary depending on your speed) -
Look "Rear-view mirror", "Right side mirror" and "Right-back" (10-mark) and then, turn the steering wheel to move close to the center line (5-mark).
-
Turn the steering wheel back to neutral and drive 30m while keeping close to the center line (5-mark).
【Image 7-3-1 Veering to the right before turning right】
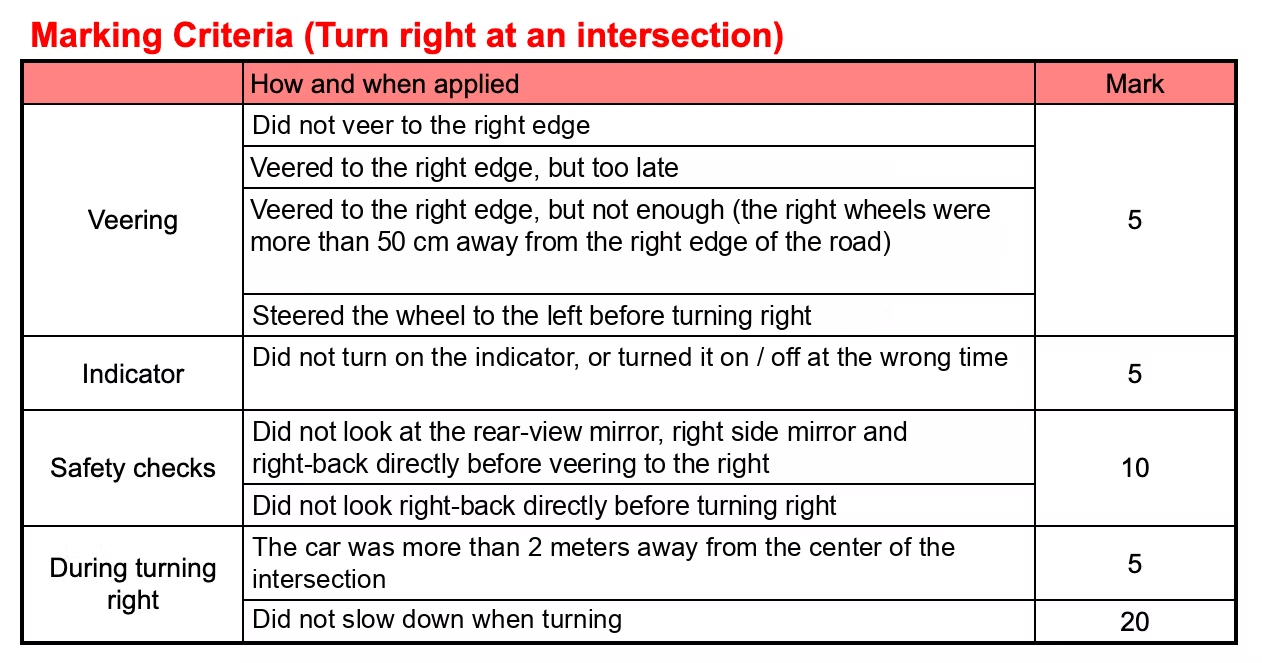
7-3-2. Turning right

【Image 7-3-2-1 Turning right】
Steps to turn right
4. Look left and right before entering the intersection (10-mark).
5. Look right side mirror & right-back and then turn the steering wheel to turn (10-mark).
6. Enter the leftmost lane.
The correct path of the left front wheel inside the intersection
Usually, an intersection has a center mark. A cross intersection has a diamond-shaped center mark and a T-junction has an inverted triangle center mark.
When turning right inside the intersection, you are required to go slowly around the inside edge of the center (see Image).
What you should not do is to turn short of the center of an intersection or to turn wide, around the center of the intersection (within 2 meters in each direction is acceptable) (See Image ).

【Image 7-3-2-2 Correct Path during the right turn】
【Video 7-3 Right Turn】
Turn right on a road with two lanes on each side
So far, we have looked at how to turn right on a road with a single lane on each side.
So if you are driving on a road with two lanes on each side, how should you turn?
Again, there are 2 phases:
-
Veering to the right (from the leftmost lane to the right edge of the 2nd lane from the left)
-
Turning right
2-1. and enter the leftmost lane
2-2. and enter the 2nd lane from the left
2-3. and enter the right edge of the 2nd lane from the left.
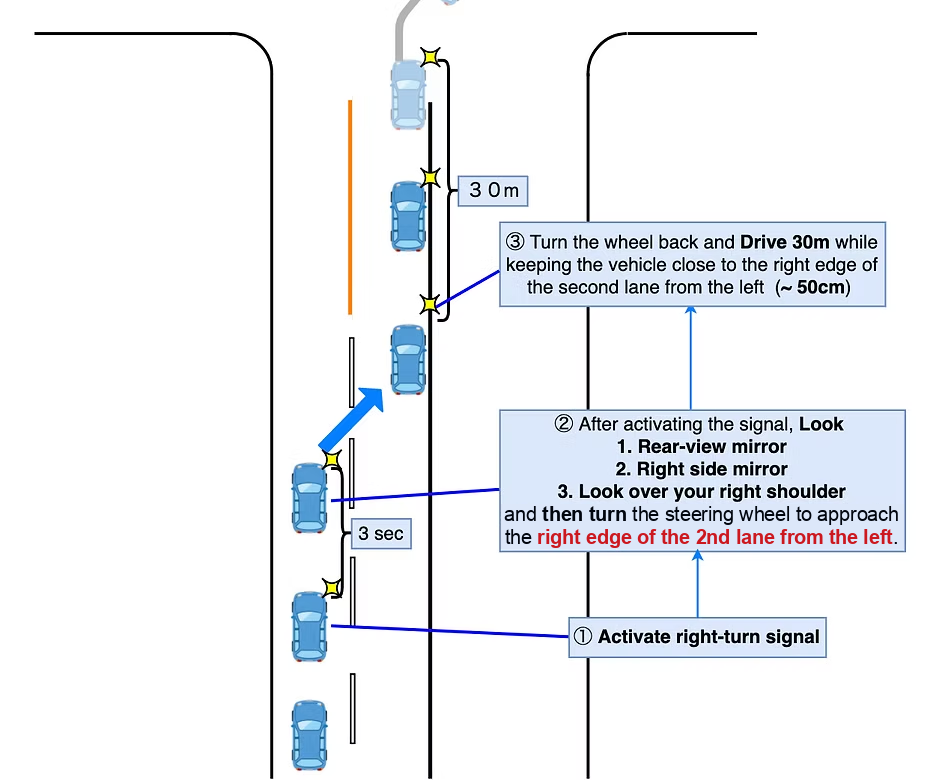
【Image 7-3-2-3 Veering to the right】
Phase 1. Veering to the right
Normally, you drive in the leftmost lane on a road with two lanes on each side.
However, if you want to turn right at an intersection, you have to move to the right lane beforehand.
Steps to veer to the right lane
-
Turn on a right turn signal
(at roughly 50m behind the intersection, though this can vary depending on your speed) -
Look "Rear-view mirror", "Right side mirror" and "Right-back" directly, then move to the right edge of the 2nd lane from the left.
-
Turn the steering wheel back to neutral and drive 30m while keeping close to the center line.
Phase 2. Turning right and entering the lane (depending on where you go).
After you go around the inside edge of the center of an intersection, which lane you enter depends on where you go after turning right.
There are mainly 4 patterns after you pass the center of an intersection while turning right.
Pattern 1: If you drive straight ← Enter the leftmost lane.
Pattern 2: If you turn right again within 50 meters ← Enter the 2nd lane from the left.
Pattern 3: If you turn right again within 30 meters ← Enter the right edge of the 2nd lane from the left.
Pattern 4: If you turn left within 30 meters ← Enter the left edge of the leftmost lane.

【Image 7-3-2-4 Turning right and where you go】
Now, let's look at how you should drive after turning right in patterns 2 ~ 4
Pattern 2: turn right again within 50 meters
-
Enter the middle of the 2nd lane from the left.
-
Turn on a right turn signal
-
Look "Rear-view mirror", "Right side mirror" and "Right-back" directly, then move to the right edge of the 2nd lane from the left.
-
Check the right side mirror & right-back and then turn the steering wheel to turn right.

【Image 7-3-2-5 Turning right again within 50 meters】
Pattern 3: turn right again within 30 meters
-
Enter the right edge of the 2nd lane from the left.
-
Turn on a right turn signal
-
Look "Rear-view mirror", "Right side mirror" and "Right-back" directly.
(You do not have to veer to the right edge because you are already on the right edge!!) -
Check the right side mirror & right-back and then turn the steering wheel to turn right.

【Image 7-3-2-6 Turning right again within 30 meters】
Pattern 4: turn left within 30 meters
-
Enter the left edge of the leftmost lane.
-
Turn on a left turn signal
-
Look "Rear-view mirror", "Left side mirror" and "Left-back" directly.
(You do not have to veer to the left edge because you are already on the left edge!!) -
Check the left side mirror & left-back and then turn the steering wheel to turn left.
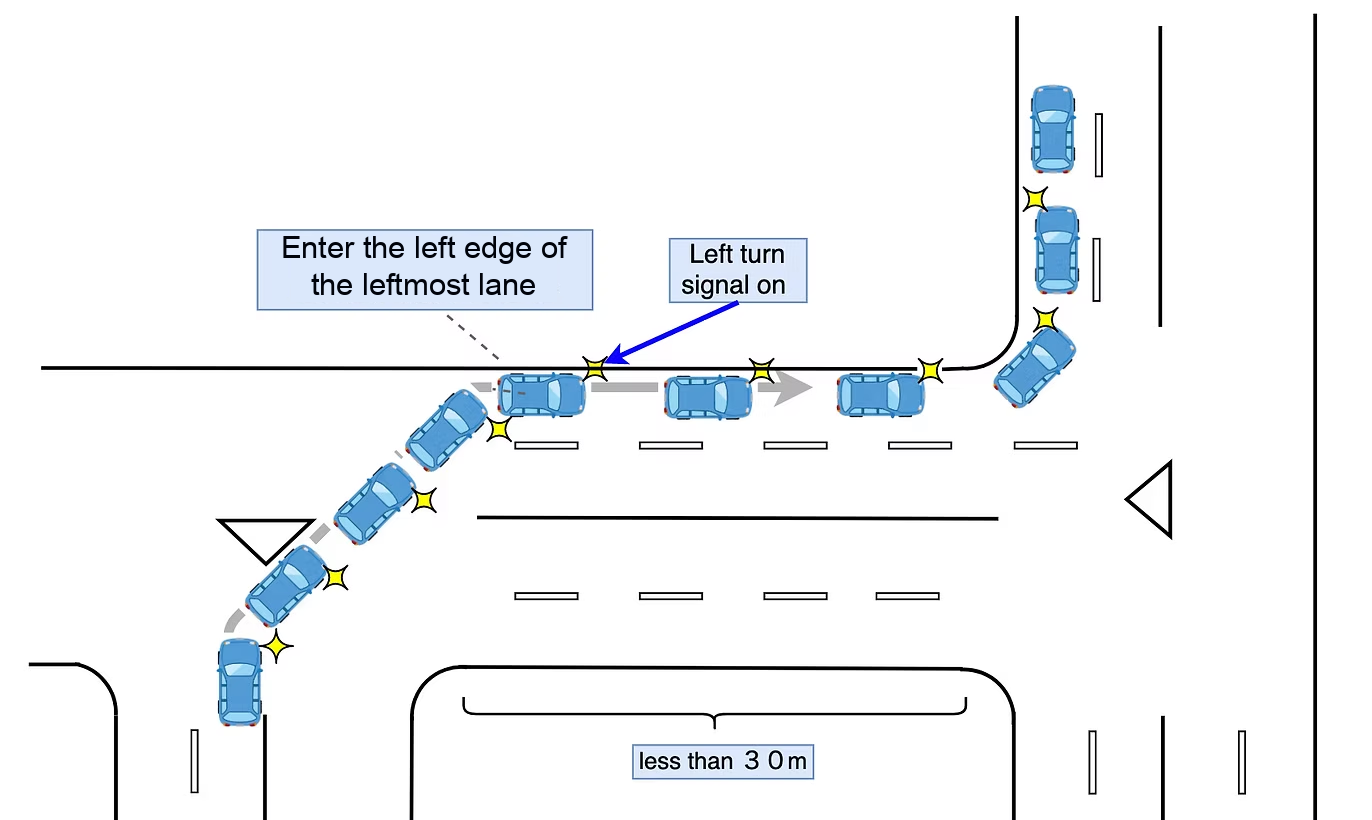
【Image 7-3-2-7 Turning left within 30 meters】
🚙 🚙 🚙 🚙 🚙 🚙 🚙 🚙 🚙 🚙 🚙 🚙 🚙
Lesson 8: Intersection with poor visibility
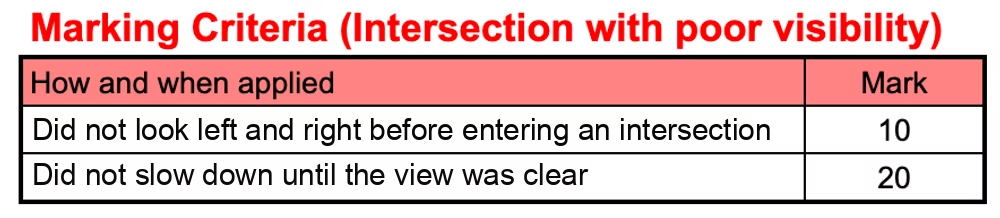
You will most likely be driving through an intersection with poor visibility.
When driving through this kind of intersection, you are required to slow down significantly until you can see clearly (20-mark).
Once you can clearly see both left and right, you can start accelerating gradually.
【Video 8 Intersection with poor visibility】
🚙 🚙 🚙 🚙 🚙 🚙 🚙 🚙 🚙 🚙 🚙 🚙 🚙
🏫 Lesson 9: Parking / Getting out of a car 🏫
Well done, this section is actually the last lesson you will learn!
This is also the last part of the exam, namely parking the car and then getting out of it.

【Image 9-1 Stopping】
【Video 9: Stopping a car】

Your examiner will tell you where you finish the exam (stop the car) beforehand.
Take these steps to pull over and park.
-
Turn on a left turn signal (5-mark)
-
Look "Rear-view mirror", "left side mirror" and "Left-back" (10-mark) and then, turn the steering wheel to the left to move to the left edge
-
Slow down and adjust your car position so that you are very close to the left edge of the road (5-mark).
Use your left side mirror to adjust your car position (see image)
(Do not let your left wheels step over the line (20-mark)) -
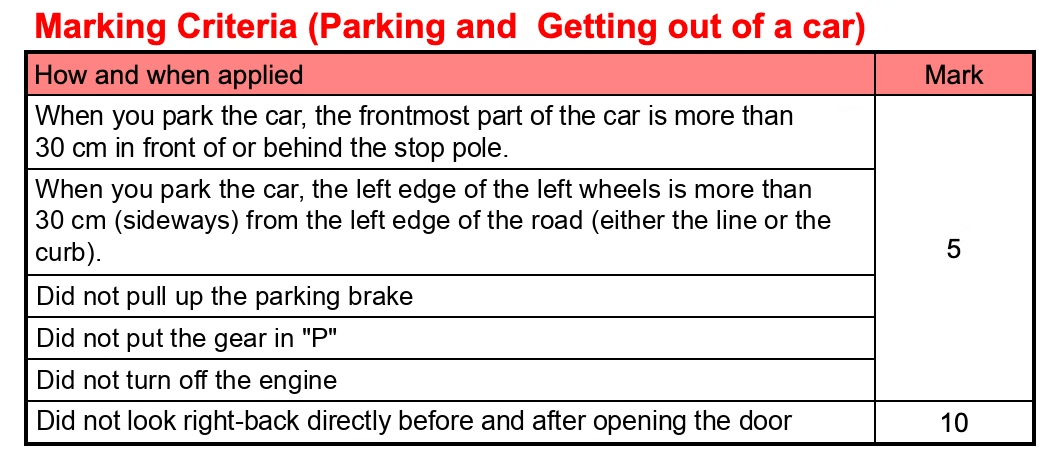
Once you stop the car, pull up the parking brake (5-mark), put the gear to "P" (5-mark) and turn off the engine (5-mark).
-
Unfasten your seatbelt and return the driver's seat to its original position.
-
Look right back and open the door a little. Look right back again and get out of the car (10-mark).
【Image 9-2: Adjusting to the left by looking into the left side mirror】


Q. Where exactly do I need to stop?

Your examiner will also assess your ability to stop the car in the proper position.
In order to stop correctly, these two conditions need to be met.
-
The left wheels (both front and back) need to be within 30 cm from the left line (see Image 9-4) (5-mark).
-
The frontmost part of the car is in line with the stop pole (within 30 cm front and back is acceptable) (see Image 9-5) (5-mark).
【Image 9-3: Where exactly you need to stop】
【Image 9-4: Adjusting to the left】
【Image 9-5: Adjusting the car front】
🚙 🚙 🚙 🚙 🚙 🚙 🚙 🚙 🚙 🚙 🚙 🚙 🚙
🏫 Lesson 10: Hill Start 🏫
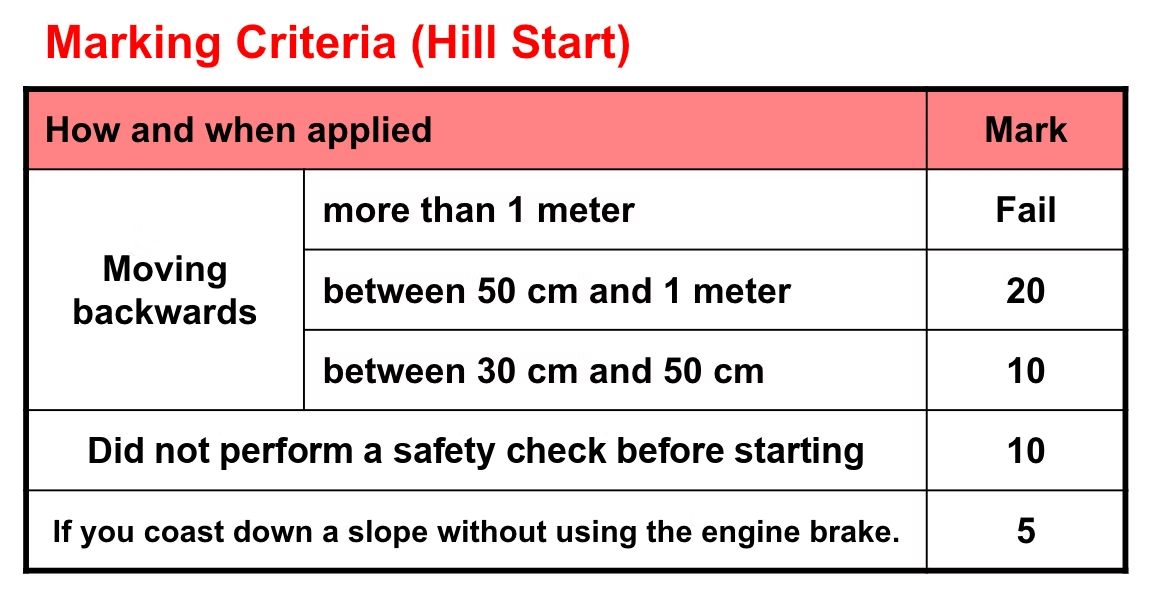
🚗 Hill Start (AT) – Step by Step
1. Align the front of your car with the pole and stop
・ The examiner will instruct you to stop once on the uphill section and then start moving again.
・ Stop when the front edge of your car is approximately aligned with the pole on the slope.
2. Apply the parking brake
3. Check safety – 5-point checking (5-mark)
・ Left blind spot → Left side mirror → Rear-view mirror → Right side mirror → Right blind spot
4. Start moving
・ Press the accelerator pedal slightly (just enough that the car doesn’t move yet).
・ While keeping light pressure on the accelerator, firmly release the parking brake.
・ The car should move forward smoothly without rolling backward.
5. At the top of the hill
・ Once you reach the top of the slope, shift to a lower gear (2 or L) to use engine braking for the downhill.
6. Go down the hill slowly
・Do not accelerate. Let the car move down by gravity and control your speed with gentle braking.
・After finishing the downhill, shift back to “D” and continue driving normally.
🚙 🚙 🚙 🚙 🚙 🚙 🚙 🚙 🚙 🚙 🚙 🚙 🚙
🏫 Lesson 11: Passing a railroad crossing 🏫
🚗 Railway Crossing (AT) – Step by Step
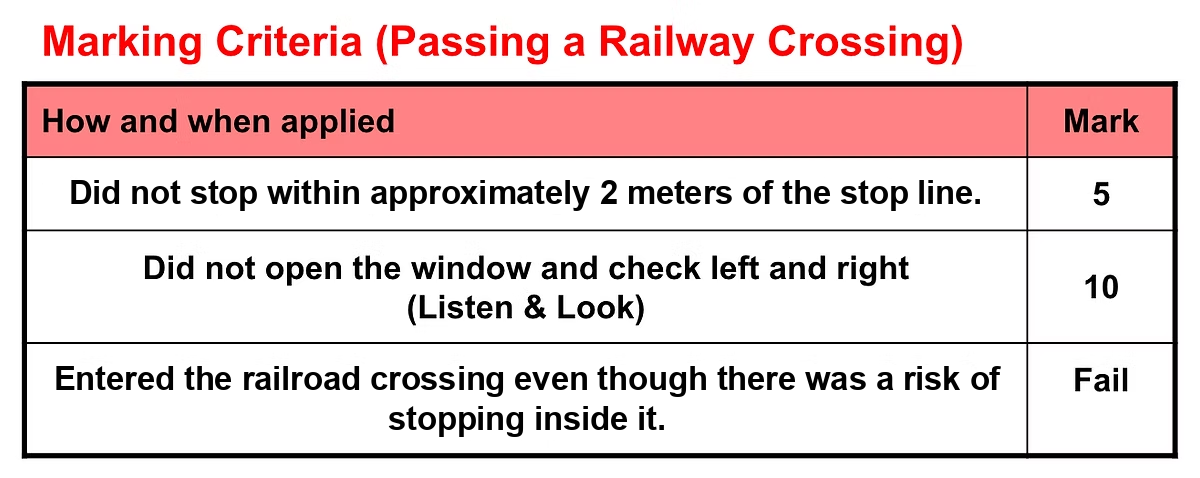
1. Stop completely before the stop line
-
Stop just before the white stop line.
-
If there is no stop line, stop before the tracks.
-
Make sure the car is completely still (no rolling).
2. Check safety – look and listen carefully (10-mark)
-
Open the window
-
Check to the left and right
-
Close the window
3. Proceed only if it’s safe
-
Start moving only when there is enough space on the other side of the crossing.
-
Do not enter if traffic is blocking the exit.
-
Drive straight across without stopping or changing gears.
🚙 🚙 🚙 🚙 🚙 🚙 🚙 🚙 🚙 🚙 🚙 🚙 🚙
🏫 Lesson 12: Designated Speed Zone 🏫
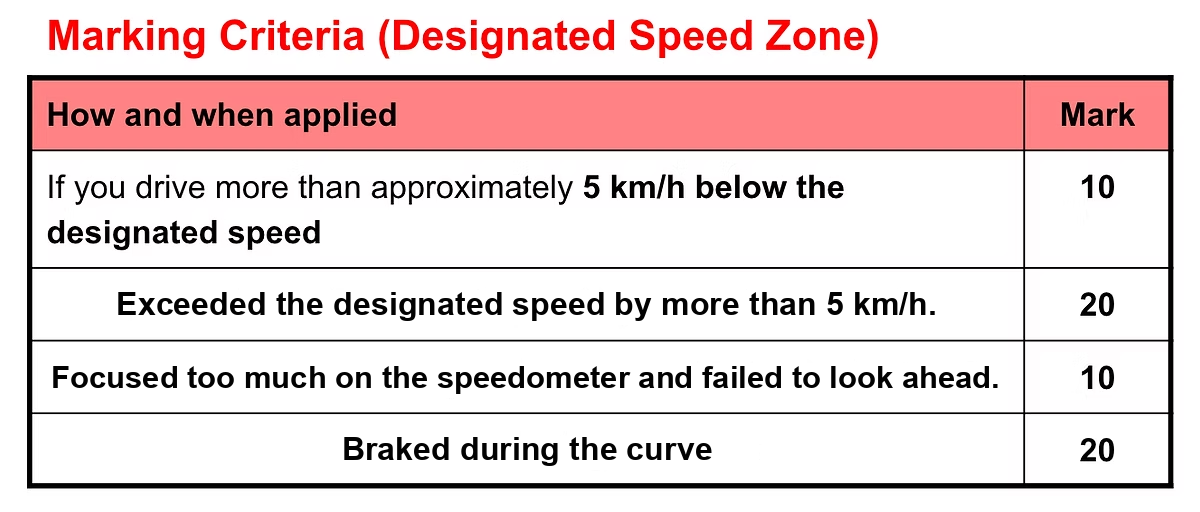
In the driving test, there is a section where you must reach the instructed speed and then slow down safely.
The goal is to show smooth acceleration, stable control, and safe deceleration, not to hold an exact number.
🚗 Step by Step Guide
1. Accelerate smoothly
-
When the examiner instructs you to drive at the designated speed, start accelerating as you enter the section.
-
Press the accelerator gently and steadily to build up speed.
-
Aim to reach the instructed speed with calm and confident control.
2. Quick speed check (-10 marks)
-
Glance at the speedometer to confirm you’ve reached the instructed speed — no need to stare.
-
You don’t have to hold the exact number; a brief reach is enough to show proper acceleration.
3. Begin slowing down
-
After confirming your speed, start braking gradually.
-
Use smooth and gentle braking to slow down safely and stay in control.
4. Complete your deceleration
-
In most testing centers, the designated speed section ends as you approach a curve.
-
Before entering the curve, you should have finished slowing down sufficiently.
-
Keep your right foot ready on the accelerator to adjust speed after the curve.
5. Enter the curve safely
-
Never brake while turning — this is a serious mistake (−20 points).
-
Avoid reducing speed too much; enter the curve smoothly and maintain balance.